Featured

The best guide for Youtube Monetization 2023

Earning money on YouTube involves creating engaging content, building a loyal audience, and leveraging various monetization methods offered by the platform. Here's a step-by-step guide to help you get started:

The best guide for Youtube Monetization
1. Choose Your Niche: Select a topic you're passionate about and knowledgeable in. It should also have a sizable audience to ensure your videos have viewers.

2. Create High-Quality Content:
- Invest in a good camera, microphone, and video editing software to produce high-quality videos.
- Craft compelling titles, descriptions, and thumbnails to attract viewers.
- Plan your content to be informative, entertaining, or educational, depending on your niche.

3. Upload Regularly: Consistency is key. Upload videos on a consistent schedule so your audience knows when to expect new content.

4. Build Your Audience:
- Engage with your viewers by responding to comments and asking for feedback.
- Promote your videos on social media platforms and relevant online communities.
- Collaborate with other YouTubers to tap into their audiences.

5. Optimize for Search Engines (SEO):
- Research relevant keywords using tools like Google Keyword Planner or TubeBuddy.
- Include target keywords in your video titles, descriptions, and tags.
- Create playlists and use relevant keywords in their titles.

6. Enable Monetization:
- Join the YouTube Partner Program (YPP) when you meet the eligibility criteria (1,000 subscribers and 4,000 watch hours in the past 12 months).
- Go to YouTube Studio > Monetization to enable ads on your videos.

7. Explore Monetization Options:
- Ad Revenue: YouTube shares a portion of the ad revenue generated by your videos. The amount varies based on factors like video length, viewer engagement, and ad types.
- Channel Memberships: Offer exclusive perks to subscribers in exchange for a monthly fee.
- Super Chat and Super Stickers: Viewers can pay to have their messages highlighted during live chat.
- YouTube Premium Revenue: Get a share of the YouTube Premium subscription fee based on how much Premium members watch your content.
- Merchandise Shelf: Promote your merchandise directly on your channel.

8. Follow YouTube's Guidelines and Policies:
- Abide by YouTube's Community Guidelines and avoid copyright violations.
- Create original content or use content with proper permissions.

9. Engage with Your Audience:
- Interact with your viewers through comments, community posts, and live chats.
- Build a community by engaging with your audience on social media and other platforms.

10. Track Your Performance:
- Use YouTube Analytics to monitor your video performance, audience demographics, and watch time.
- Adjust your content strategy based on the insights you gather.

Remember that building a successful YouTube channel takes time and effort. It's not a guaranteed source of income, especially in the early stages. Focus on providing value to your audience and gradually build your presence to increase your chances of earning money over time.
Learn more »

Embed YouTube Video with AMP Play OnClick in Blogger

Embedding Youtube Video with AMP is a way to optimize loading in your web pages or blog. For this tutorial you are going to Embed YouTube Video with AMP Play OnClick and on Lightbox. By using this lightbox we can also make visitors focus more on the video content presented when clicking the play button or clicking on the video thumbnail image by extinguishing other content behind the lightbox overlay. There are two ways that we are going to use for this tutorial, by using BUTTON and video THUMBNAIL

Embed YouTube Video with AMP Play OnClick in Blogger


1. Play amp-youtube on click using Button

Live Demo - BUTTON


Let us begin with the tutorial:

Step #1: Log in to your Blogger Account and Go to your Blogger Dashboard.

Step #2: Click Theme --> Edit HTML.

Step #3: Find </head> by Pressing CTRL + F (Windows) or CMD + F (MAC)

Step #4: Now paste the below code above/before  </head> tag.


<script async="async" custom-element="amp-lightbox" src="https://cdn.ampproject.org/v0/amp-lightbox-0.1.js"></script>
<script async="async" custom-element="amp-youtube" src="https://cdn.ampproject.org/v0/amp-youtube-0.1.js"></script>

Step #5: For CSS find this tag: ]]></b:skin>, just above it add the code below.


.center,.video-box{text-align:center}
.lightbox-video{background:rgba(0,0,0,.8);width:100%;height:100%;position:absolute;display:flex;align-items:center;justify-content:center}
.video-box{width:100%;max-width:800px;margin:0 auto}
.btn-play{color:#fff;background-color:#D32F2F;padding:10px 16px 10px 40px;position:relative;font:500 18px Roboto,sans-serif;line-height:1.3333333;border-radius:6px;margin-bottom:5px;text-align:center;white-space:nowrap;vertical-align:middle;-ms-touch-action:manipulation;touch-action:manipulation;cursor:pointer;-webkit-user-select:none;-moz-user-select:none;-ms-user-select:none;user-select:none;border:1px solid transparent;display:inline-block;background-image:none;-moz-box-sizing:border-box;-webkit-box-sizing:border-box;box-sizing:border-box}
.btn-play:active,.btn-play:focus,.btn-play:hover{color:#fff;background-color:#C62828;border-color:#B71C1C}
.btn-play:before{content:"";color:#fff;background-image:url(https://blogger.googleusercontent.com/img/b/R29vZ2xl/AVvXsEgAzP9d_P-EKKungS3AI6bx2sttoQYKtQeGCAW1Q-u5BsBMpt6-7O-aNWnHZ2jJCUtjXxYTLUCKamfZPtjiI06vwHdmRBd-DuexPBiU9CDqBA0_jECowo-ugI61BrNZQ2KOV7eUS35MU3Wv/s1600/play.png);background-size:cover;background-repeat:no-repeat;width:30px;height:40px;position:absolute;left:0;top:50%;margin-top:-20px}


For posting: Use the below code, paste in your blogger post editor.


<amp-lightbox id="open-video" layout="nodisplay">
<div class="lightbox-video" on="tap:open-video.close,btn-play.show" role="button" tabindex="0" aria-label="Close Video">
<div class="video-box">
<amp-youtube id="video" data-videoid="Eng0tMkA6Y8" height="270" layout="responsive" width="480" data-param-controls="0" data-param-rel="0" data-param-showinfo="0" data-param-modestbranding="1" data-param-autohide="1" hidden></amp-youtube>
</div>
</div>
</amp-lightbox>
<div class="center">
<button id="btn-play" class="btn btn-lg btn-play" on="tap:video.show, video.play, btn-play.hide, open-video" aria-label="Play Video">Play Video</button>
</div>

Note: Change the red code with your Youtube Video ID.


2. Play amp-youtube on click with Thumbnail

Live Demo - THUMBNAIL


Let us begin with the tutorial:

Step #1: Log in to your Blogger Account and Go to your Blogger Dashboard.

Step #2: Click Theme --> Edit HTML.

Step #3: Find </head> by Pressing CTRL + F (Windows) or CMD + F (MAC)

Step #4: Now paste the below code above/before  </head> tag.


<script async='async' custom-element="amp-lightbox" src="https://cdn.ampproject.org/v0/amp-lightbox-0.1.js"></script>
<script async='async' custom-element='amp-youtube' src='https://cdn.ampproject.org/v0/amp-youtube-0.1.js'></script>

Step #5: For CSS find this tag: ]]></b:skin>, just above it add the code below.


.video-box,.video-img{width:100%;margin:0 auto;text-align:center}
.lightbox-video{background:rgba(0,0,0,.8);width:100%;height:100%;position:absolute;display:flex;align-items:center;justify-content:center}
.video-box{max-width:800px}
.video-img{max-width:600px;position:relative}
.playonimage{cursor:pointer;margin:auto;width:56px;height:56px;-webkit-border-radius:50%;border-radius:50%;background-color:rgba(0,0,0,.2);background-image:url(https://blogger.googleusercontent.com/img/b/R29vZ2xl/AVvXsEh7e_hvx_P6RezuDIzHAlecKPE3NNIHHLGAtHRdl_71w_DpoDKRAasKpq8qfDkNG1wWkdwPm92AnpKfCvI-PjFdjRChQxPia0ucPIlVcvcU6KZOGPYaKngJ2dXeGQ51YixftvzFapdqyZCV/s1600/play_circle_filled_white_48dp.png);background-position:center;-webkit-background-size:48px 48px;background-size:48px 48px;position:absolute;top:0;bottom:0;left:0;right:0}


For posting: Use the below code, paste in your blogger post editor.


<amp-lightbox id="open-video" layout="nodisplay">
<div class="lightbox-video" on="tap:open-video.close,btn-play.show" role="button" tabindex="0" aria-label="Close Video">
<div class="video-box">
<amp-youtube id="video" data-videoid="Eng0tMkA6Y8" height="270" layout="responsive" width="480" data-param-controls="0" data-param-rel="0" data-param-showinfo="0" data-param-modestbranding="1" data-param-autohide="1" hidden></amp-youtube>
</div>
</div>
</amp-lightbox>
<div class="video-img" id="btn-play" on="tap:video.show, video.play, btn-play.hide,open-video" role="button" tabindex="0" aria-label="Play Video">
<amp-img alt="Video" src="https://i.ytimg.com/vi/Eng0tMkA6Y8/mqdefault.jpg" width="637" height="356" layout="responsive"></amp-img>
<div class="playonimage"></div>
</div>


Note: Change the red code with your Youtube Video ID.

Conclusion

Congrats !! You have made it. Now you have learned How to Embed YouTube Video with AMP Play OnClick in Blogger. Hope you liked this tutorial, if you enjoyed then please share it with your friends, please stay tuned with Us for more such awesome tutorials. Happy Blogging!
Learn more »

Adding Pre code in Blogger Site

Pre code is used when you want to emphasize and organize codes in your blog post. Though you can used blockqoute but Pre code looks more professional and at the same time it gives your visitors the emphasis what kind of code you are sharing.

Pre code has unique feature such as, you can specify the kind of code your sharing e.g. CSS, JAVASCRIPT and HMTL, display in professional way and easy to select script by double click on Pre code block.

Adding Pre code in Blogger Site


Adding Pre code in Blogger Site

This widget is powered by Font awesome version 4.3.0 so first we need to add font awesome file to your blogger template.

Step #1: Log in to your Blogger Account and Go to your Blogger Dashboard.

Step #2: Click Theme --> Edit HTML.

Step #3: Find <head> by Pressing CTRL + F (Windows) or CMD + F (MAC)

Step #4: Now paste the below code below/after <head> tag.


<link href='//netdna.bootstrapcdn.com/font-awesome/4.3.0/css/font-awesome.min.css' rel='stylesheet'/>

Step #5: Now find ]]></b:skin>  by Pressing CTRL + F (Windows) or CMD + F (MAC)

Step #6: Copy and paste the below code above /before  ]]></b:skin>


/* CSS Pre Code */
pre {
    background: #444444;
    white-space: pre;
    word-wrap: break-word;
    overflow: auto;
}
pre.code {
    margin: 20px 25px;
    border-radius: 4px;
    border: 1px solid #292929;
    position: relative;
}
pre.code label {
    font-family: sans-serif;
    font-weight: bold;
    font-size: 80%;
    color: #3C99F9;
    position: absolute;
    left: 1px;
    top: 15px;
    text-align: center;
    width: 60px;
    -webkit-user-select: none;
    -moz-user-select: none;
    -ms-user-select: none;
    pointer-events: none;
}
pre.code code {
    font-family: "Inconsolata","Monaco","Consolas","Andale Mono","Bitstream Vera Sans Mono","Courier New",Courier,monospace;
    display: block;
    margin: 0 0 0 60px;
    padding: 15px 16px 14px;
    border-left: 1px solid #555;
    overflow-x: auto;
    font-size: 13px;
    line-height: 19px;
    color: #ddd;
}
pre::after {
    content: "double click to selection";
    padding: 0;
    width: auto;
    height: auto;
    position: absolute;
    right: 18px;
    top: 14px;
    font-size: 12px;
    color: #ddd;
    line-height: 20px;
    overflow: hidden;
    -webkit-backface-visibility: hidden;
    transition: all 0.3s ease;
}
pre:hover::after {
    opacity: 0;
    visibility: visible;
}
pre.css code {
    color: #4899CE;
}
pre.html code {
    color: #EF662A;
}
pre.javascript code {
    color: #F4C22B;
}

Step #7: Now find </body>  by Pressing CTRL + F (Windows) or CMD + F (MAC)

Step #8: Copy and paste the below code above /before  </body>


<script type='text/javascript'>
$('i[rel="pre"]').replaceWith(function() {
    return $('<pre><code>' + $(this).html() + '</code></pre>');
});
var pres = document.querySelectorAll('pre,kbd,blockquote');
for (var i = 0; i < pres.length; i++) {
  pres[i].addEventListener("dblclick", function () {
    var selection = getSelection();
    var range = document.createRange();
    range.selectNodeContents(this);
    selection.removeAllRanges();
    selection.addRange(range);
  }, false);
}
</script>

Step #9: save your template.

How to use Pre code in your Blog Post?

Note: Editor should be in HTML view..


<pre class='code html'><label><i class='fa fa-html5 fa-lg'></i> HTML</label><code>
Add HTML code here
</code></pre>

<pre class='code css'><label><i class='fa fa-css3 fa-lg'></i> CSS</label><code>
Add CSS code here
</code></pre>

<pre class='code javascript'><label><i class='fa fa-code fa-lg'></i> JS</label><code>
Add JavaScript code here
</code></pre>


Conclusion

Congrats !! You have made it. Now you have learned How to Add Pre code in Blogger Site. Hope you liked this tutorial, if you enjoyed then please share it with your friends, please stay tuned with Us for more such awesome tutorials. Happy Blogging!
Learn more »

How to Add A Comment Count Bubble to Blogger post title

A comment count bubble displayed the current number of comment/s on each blogger post. You can display this Comment Count Bubble wherever you want on your blog post but for this tutorial we are going to display it on your Blog post title. Best thing about Comment Count Bubble it gives you the idea which among your blog post had the most engagement of visitors.

How to Add A Comment Count Bubble to Blogger post title


How to Add A Comment Count Bubble to Blogger post title?

Let us begin with the tutorial:

Step #1: Log in to your Blogger Account and Go to your Blogger Dashboard.

Step #2: Click Theme --> Edit HTML.

Step #3: Find ]]></b:skin> by Pressing CTRL + F (Windows) or CMD + F (MAC)

Step #4: Now paste the below code above/before ]]></b:skin> tag.

     .comment-bubble {
    float : right;
    width : 48px;
    height : 48px;
    background : url(https://blogger.googleusercontent.com/img/b/R29vZ2xl/AVvXsEjaLKZZ6nWYJKMjCKSHyABXxzgjPQ8QhxS_aGpauj6MvlqFIVLAJiaDDPN96BFXBPh0ZFXk7QA_Hx6H0sOppuL9ALTn_5xLUHD4OqgYHbJRKslonujIEfKGNIWNp6rEaBC9CJt09zAi78XB/s1600/comment+bubble2.png);
    background-repeat: no-repeat;
    font-size : 18px;
    margin-top : -15px;
    margin-right : 2px;
    text-align : center;
    }

Step #5: Now find this code:

<b:if cond='data:post.title'>
<h3 class='post-title entry-title'>

or (If you can't find the code above)


<b:if cond='data:post.title'>
<h3 class='post-title entry-title' itemprop='name'>

Step #6: Add the below code immediately after it:

<b:if cond='data:post.allowComments'>
<a class='comment-bubble' expr:href='data:post.addCommentUrl' expr:onclick='data:post.addCommentOnclick' style='color: #000000; font-size: 18px; font-weight: bold;'><data:post.numComments/></a>
</b:if>

Note: Change font color mark in red: color: #000000;
        Change font size mark in red: font-size: 18px;

Step #7: Save your template and Preview the result.

Conclusion

Congrats !! You have made it. Now you have learned How to Add A Comment Count Bubble to Blogger post title. Hope you liked this tutorial, if you enjoyed then please share it with your friends, please stay tuned with Us for more such awesome tutorials. Happy Blogging!
Learn more »

How to install Reaction Buttons in Blogger - Complete Guide with Pictures

How to Add Reaction Buttons in Blogger?

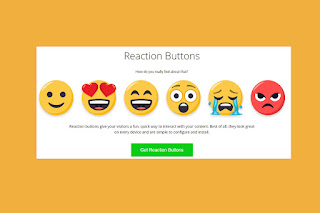
The most common idea why you want to add reaction button in your site is that Reaction buttons give your visitors a fun, quick way to interact with your content. That is also a big impact on your side knowing whether your visitors like or dislike your content. If you receive more like reactions then better continue what you are doing but if dislike then better change or improve more your content, as simple as that.


How to install Reaction Buttons in Blogger


Let us begin with the tutorial, simply follow the steps below:

Step #1: Create an account at ShareThis.com

For this tutorial, We are going to use reaction buttons from sharethis platform. What are sharethis reaction buttons? ShareThis reaction buttons allow your site visitors to react to your content in a single click: Like it. Love it. Wow. LOL. Sad. Angry.

The beauty of reaction buttons is that they lower the barrier to interaction: Instead of having to comment, share, or choose any other form of interaction, your website visitors can provide instant feedback to any content – photos, blog posts, new site pages, video, etc. – with close to zero effort. And that’s your ticket to more interaction from more people.

Step #2: After Creating an Account, Log-in and You will be directed to ShareThis APP Directory.

Step #3: On the Upper Right, Click Drop Down Arrow and Select "Setup New Property.

How to install Reaction Buttons in Blogger


Step #4: It will ask you to give the Name of your New Property Domain. Just simply type your blog URL then click "ADD".

How to install Reaction Buttons in Blogger


Step #5: Now look for Engagement Tools and Choose Reaction Share Buttons.

How to install Reaction Buttons in Blogger

Buttons Configuration:
  • Click a reaction to add or remove it from your buttons
  • Click and drag a reaction to reorder
  • Choose left, center, or right alignment
  • Choose your language

Step #6: We are going to verify your domain by installing the sharethis.js code into your Blogger template.

How to install Reaction Buttons in Blogger


Step #7: Go to your Blogger Dashboard --> Select Theme --> Edit HTML --> Paste the given code after <head>. . Once Done Click Verify.


Note: If you will encounter problem in saving regarding CMS in the code "product=inline-reaction-buttons&cms=sop" simply replace "&" from your script with "&amp;". Code should be like this:  "product=inline-reaction-buttons&amp;cms=sop".

Step #8: Copy and Paste the next code where you want to show reaction buttons.

How to install Reaction Buttons in Blogger


To Show Reaction Buttons Below Posts:

If you want to show reaction buttons below your posts then copy below code and paste it above  <div class='post-footer'>  in your theme code.

<b:if cond='data:blog.pageType == "item"'>
<div class="sharethis-inline-reaction-buttons"></div>
</b:if>

Note: You will find  <div class='post-footer'>  two times in your theme paste the above code above second  <div class='post-footer'>.

Step #9: Click Save and your done.

If you want to update your Reaction Buttons simply make all the updates at your Sharethis APP dashboard.

That's all for this tutorial. Feel free to comment below if you have any questions or suggestions.  If you like this post kindly share and even share us a beer!

Happy Blogging!
Learn more »

How to Add Youtube Subscribe Button in Blogger

Youtube is the most famous video sharing website nowadays. If you have your Youtube Channel and you want to increase your subscribers then this tutorial will give the idea on how to Add Youtube Subscribe Button in your Blogger site.

How to Add Youtube Subscribe Button in Blogger

Demo: Click and Subscribe!


How to Add Youtube Subscribe Button in Blogger?

Let us begin with the tutorial, simply follow the steps below:

Step #1: Go to Youtube Developer's Page

The tool below lets you configure an embedded subscription button. You can set the button's display options, preview the button, and copy the code needed to insert that button on your page.You can see the preview of the button below the options.

How to Add Youtube Subscribe Button in Blogger
Step #2: After you fill the required data, scroll down and copy the generated code.

How to Add Youtube Subscribe Button in Blogger

Step #3: Log in to your Blogger Account and Go to your Blogger Dashboard.


Step #4: Click Layout --> Add gadget --> Choose HTML/Javascript.
Step #5: Copy and Paste Youtube generated subscribe button code into it.

Step #6: Click Save and your done.

You can arrange wherever you want to put your Subscribe button.

That's all for this tutorial. Feel free to comment below if you have any questions or suggestions.  If you like this post kindly share and even share us a beer! Thanks Happy Blogging!
Learn more »

How to add CSS3 Animated DOWNLOAD/DEMO button for Blogger

If your sharing download/demo in your blog, then you must use a fancy button to attract your visitors. This tutorial will give you the option to add fancy button. This button is purely CSS3 so it is easy for you to integrate in your blogger template. You can refer below for the demo button.

How to add CSS3 Animated DOWNLOAD/DEMO button for Blogger


Adding the CSS in the Template

Let us begin with the tutorial, simply follow the steps below:

Step #1: Log in to your Blogger Account and Go to your Blogger Dashboard.

Step #2: Click Theme --> Edit HTML.

Step #3: Find </body> by Pressing CTRL + F (Windows) or CMD + F (MAC)

Step #4: Now paste the below code above/before </body> tag.

<style> .abt-button { margin: 50px auto; width: 200px; } /* Get this button at vblogger-templates.blogspot.com */ .abt-button a { background: -moz-linear-gradient(center top , #00B7EA 0%, #009EC3 100%) repeat scroll 0 0 transparent; color: white; display: block; font: 17px/50px Helvetica,Verdana,sans-serif; height: 50px; text-align: center; text-decoration: none; text-transform: uppercase; width: 200px; position: relative; z-index: 2; /*TYPE*/ color: white; font: 17px/50px Helvetica, Verdana, sans-serif; text-decoration: none; text-align: center; text-transform: uppercase; /*GRADIENT*/ background: #00b7ea; /* Old browsers */ background: -moz-linear-gradient(top, #00b7ea 0%, #009ec3 100%); /* FF3.6+ */ background: -webkit-gradient(linear, left top, left bottom, color-stop(0%,#00b7ea), color-stop(100%,#009ec3)); /* Chrome,Safari4+ */ background: -webkit-linear-gradient(top, #00b7ea 0%,#009ec3 100%); /* Chrome10+,Safari5.1+ */ background: -o-linear-gradient(top, #00b7ea 0%,#009ec3 100%); /* Opera 11.10+ */ background: -ms-linear-gradient(top, #00b7ea 0%,#009ec3 100%); /* IE10+ */ background: linear-gradient(top, #00b7ea 0%,#009ec3 100%); /* W3C */ filter: progid:DXImageTransform.Microsoft.gradient( startColorstr=&#39;#00b7ea&#39;, endColorstr=&#39;#009ec3&#39;,GradientType=0 ); /* IE6-9 */ } .abt-button a, .abt-button p { -webkit-border-radius: 10px; -moz-border-radius: 10px; border-radius: 10px; -webkit-box-shadow: 2px 2px 8px rgba(0,0,0,0.2); -moz-box-shadow: 2px 2px 8px rgba(0,0,0,0.2); box-shadow: 2px 2px 8px rgba(0,0,0,0.2); } .abt-button p { background: #222222; color: #FFFFFF; display: block; font: 12px/45px Helvetica,Verdana,sans-serif; height: 40px; margin: -40px 0 0 10px; position: absolute; text-align: center; transition: margin 0.5s ease 0s; width: 180px; z-index: 1; /*TRANSITION*/ -webkit-transition: margin 0.5s ease; -moz-transition: margin 0.5s ease; -o-transition: margin 0.5s ease; -ms-transition: margin 0.5s ease; transition: margin 0.5s ease; } .abt-button:hover .up { margin: -5px 0 0 10px !important; } .abt-button:hover .down { line-height: 35px !important; margin: -85px 0 0 10px !important; } .abt-button a:active { background: #00b7ea; /* Old browsers */ background: -moz-linear-gradient(top, #00b7ea 36%, #009ec3 100%); /* FF3.6+ */ background: -webkit-gradient(linear, left top, left bottom, color-stop(36%,#00b7ea), color-stop(100%,#009ec3)); /* Chrome,Safari4+ */ background: -webkit-linear-gradient(top, #00b7ea 36%,#009ec3 100%); /* Chrome10+,Safari5.1+ */ background: -o-linear-gradient(top, #00b7ea 36%,#009ec3 100%); /* Opera 11.10+ */ background: -ms-linear-gradient(top, #00b7ea 36%,#009ec3 100%); /* IE10+ */ background: linear-gradient(top, #00b7ea 36%,#009ec3 100%); /* W3C */ filter: progid:DXImageTransform.Microsoft.gradient( startColorstr=&#39;#00b7ea&#39;, endColorstr=&#39;#009ec3&#39;,GradientType=0 ); /* IE6-9 */ } .abt-button:active .up { margin: -20px 0 0 10px !important; } .abt-button:active .down { margin: -70px 0 0 10px !important; } </style>

Step #5: Click Save Template and your done.

Adding the Button

In adding the button in your post simply switch the post editor to HTML from Compose and add the below HTML.

div class="abt-button"> <a href="#">Download</a> <p class="up">click to begin</p> <p class="down">5MB size</p> </div>

Note: Simply change the words with red color of your own.

That's all for this tutorial. Feel free to comment below if you have any questions or suggestions.  If you like this post kindly share and even share us a beer! Thanks Happy Blogging!

Learn more »

How to install Push Notification in Blogger using OneSignal Platform

Why use Push Notification in your site? Use push notification to message your users when they might need a reminder about something. People find great value in receiving push notifications that alert them of updates or the latest news from your blog.

One of the best and reliable platform for push notification is OneSignal. OneSignal is a reliable service to send push notifications, in-app messages, and emails to your users on mobile and web, including content management platforms like blogger, Wordpress and Shopify.

What is the advantage in using OneSignal? In OneSignal documentation you can discover resources and training to implement OneSignal’s SDKs, learn how to leverage OneSignal’s powerful API, and find best practices for sending messages to increase your user engagement. In short OneSignal is user friendly and easy to integrate to your website or blog.

Install Push Notification in Blogger using OneSignal Platform


Now let us proceed with the tutorial on how to setup OneSignal in blogger site. Simply follow the instructions and you will not get lost. If you have any questions feel free to comment below.

How to set up OneSignal Web Push notifications on Blogger sites

Configuring Notification at OneSignal.

Step #1: Create an account at OneSignal.Com > Proceed to Create New App/Website.

Install Push Notification in Blogger using OneSignal Platform
Step #2: Fill-up the name of your app or website > Select Web Push > Click Configure your platform

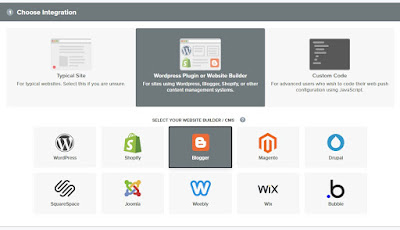
Step #3: Choose Integration


Install Push Notification in Blogger using OneSignal Platform

Note: OneSignal supports sending web push notifications from a variety of different web technologies. Select Blogger to continue

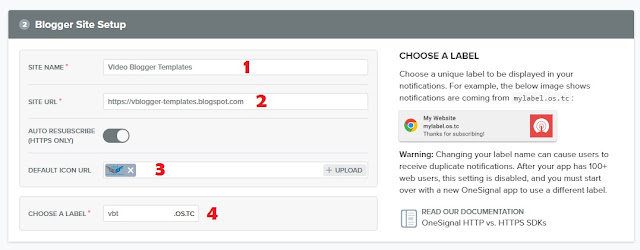
Step #4: Blogger Site Setup

Once you've selected Blogger as your integration, you must fill out information about your site.

Install Push Notification in Blogger using OneSignal Platform

Choose a Label

Blogger implementations must choose a unique label to be displayed in your notifications. For example, the above image shows notifications are coming from vbt.os.tc. I use vbt as my label.

Note: You can only change your label if you have less than 100 web users. Once you have 100+ web users, this setting is disabled.

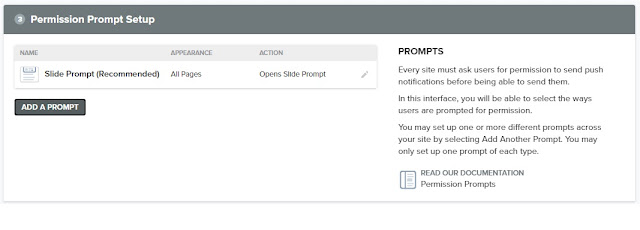
Step #5: Permission Prompt Setup


Install Push Notification in Blogger using OneSignal Platform
To send push notifications to users, you first must ask them for permission using a Prompt. You must have at least one Prompt on your site for web push to work. Click Add a Prompt to open the permission prompt selector.

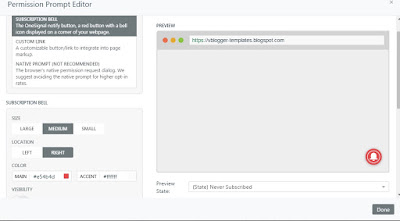
Permission Prompt Editor


Install Push Notification in Blogger using OneSignal Platform

In the Permission Prompt Editor, you can select which prompts you wish to use, and style them as you like. Once you have edited the prompt to your liking, click Save.

The following Options can be see at the Permission Prompt Editor:

Subscription Bell - a small icon at the corner of your page that users can interact with to subscribe

Slide Prompt - a small modal that comes from the center of the page and asks if users are interested in signing up.

HTTP Pop-Up Prompt (HTTP-only) - a pop-up window that appears after other prompts that is required for HTTP sites.

Custom Prompts - create your own links or buttons as prompts.

Step #6: Welcome Notification


Install Push Notification in Blogger using OneSignal Platform

Optional


Welcome notifications an optional way to thank users after subscribing to your site. Users will see a welcome notification as soon as they subscribe. You can edit or disable them here.

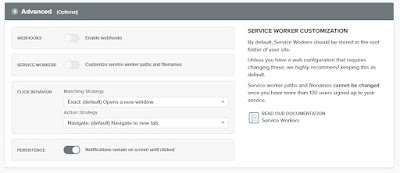
Step #7: Advanced Options


Install Push Notification in Blogger using OneSignal Platform

Optional

Most sites will not have to edit anything in Advanced options.

Step #8: Once you've completed steps 3-7, click 'Save' to save your configuration.

To enable OneSignal on your Blogger site, you will need to copy the code from Web Push Settings.


Install Push Notification in Blogger using OneSignal Platform


Adding Code to Blogger Site

Just simply follow the steps below:

Step #1: Log in to your Blogger Account and Go to your Blogger Dashboard

Step #2: Click ->Template -> Edit HTML Note: Backup your Template

Step #3: Find  by Pressing CTRL + F (Windows) or CMD + F (MAC)

Step #4: Paste the code below   tag.

Install Push Notification in Blogger using OneSignal Platform


Step #5: Save your template and you're done

Tutorial Credit: onesignal.com

That's all for this tutorials. Thanks for dropping by at vbt blog.

Happy Blogging!
Learn more »

Add Author Box Automatically below blogger post

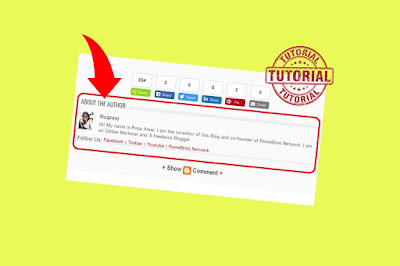
Google Blogs provide the best blogging experience where you can invite up to 100 Team members on your blog as Editor. Which means that your blog can be authored by 100 different people.


In order at atleast to give credit or to acknowledge the author of the blog post, it is good to display its Bio or information after his/her post.

For the Demo, you can also refer on the Author Bio below this post.

Now this tutorial will give you the idea on how to add author box automatically in below post.

Add Author Box Automatically below blogger post


How To Add Author Box Automatically?

Just simply follow the steps below:

Step #1: Log in to your Blogger Account and Go to your Blogger Dashboard

Step #2: Click ->Template -> Edit HTML Note: Backup your Template

Step #3: Find ]]></b:skin> by Pressing CTRL + F (Windows) or CMD + F (MAC)

Step #4: Now paste the below CSS code above/before ]]></b:skin> 

/* Author Box Code*/ .about-author {
width : 98%;
overflow : hidden;
margin:10px 0px;
border:0px;
}
.about-author img {
width:70px;
padding:3px;
border:1px solid #ddd;
margin:0px 5px 0px 0px;
}
.about-author h3{
font-family:verdana !important;
font-size:18px !important;
margin:9px 0px !important;
color:#666666 !important;
border-bottom:2px solid #666 !important;
border-top:0px !important;
}
.about-author p {
margin:0px;
text-align:justify;
color:#666;
}

Step #5: Now Search data:post.body

Step #6: Just below it paste the following code:

<b:if cond='data:blog.pageType == &quot;item&quot;'>
<b:if cond='data:post.author == &quot;AUTHOR NAME&quot;'>
<div class='about-author'>
<h3>About Author:</h3>
<img align='left' src='IMAGE LINK OF AUTHOR'/>
<p>WRITE AUTHOR BIO HERE</p>
<p>Follow him @ <a href='BLOG LINK' target='_blank'>BLOG NAME</a> | <a href='TWITTER LINK' rel='nofollow' target='_blank'>Twitter</a> | <a href='FACEBOOK LINK' rel='nofollow' target='_blank'>Facebook</a></p>
</div>
</b:if></b:if>
Step #6: Save your template

Change all necessary information with color RED and everything is set.  Find Author name in Blogger Dashboard > Settings > Under permissions - Blog Authors.

That's all for this tutorials. To all visitors thank you for dropping by at vbt blog.

Happy Blogging!
Learn more »

Tutorial: How to make sticky sidebar widget in blogger/blogspot?

Blogger widgets play a vital role for your blog. Widgets are most frequently used to customize blog sidebars. Each widget represents an area of content, which bloggers can populate with ads, text, links, images, and more. This tutorials will give you the idea on how to make sticky or fix sidebar widget in your blog purposely to emphasize the content of your widget or any other purpose it may serve depending on you.

How to make sticky sidebar widget in blogger/blogspot?

Demo, you can see Popular post of this Blog.

Let us begin with the tutorial, simply follow the steps below:

Step #1: Log in to your Blogger Account and Go to your Blogger Dashboard.

Step #2: Click Template --> Edit HTML.

Step #3: Find </head>  by Pressing CTRL + F (Windows) or CMD + F (MAC)

Step #4: Now paste the below code above/before </head> tag.

<script src="http://ajax.googleapis.com/ajax/libs/jquery/1.3/jquery.min.js" type="text/javascript"></script>
<script type="text/javascript">
$(function() {
    var ks_widget_top = $('#widget Id').offset().top;
    var ks_sticky_widgets = function(){
        var ks_current_top = $(window).scrollTop();
        if (ks_current_top > ks_widget_top) {
          $('#widget Id').css({ 'position': 'fixed', 'top':0, 'z-index':999999 });
        } else {
            $('#widget Id').css({ 'position': 'relative' });
        } 
    };
    ks_sticky_widgets();
      $(window).scroll(function() {
         ks_sticky_widgets();
    });
});</script>

Step #5: Change the widget ID of your widget that you want to make sticky and Save your template.

How to find widget ID?

Widget ID is unique ID of each of your widget. How to find widget ID, simply go to your DASHBOARD select LAYOUT then click EDIT on the widget then you can see on widget ID.
Refer of the screenshot below:

How to find widget ID in blogger

That's it for this tutorial. Happy Blogging!
Learn more »

Disable text selection in blogger Excluding Blockqoute and Precode

Content writing takes every blogger a hard time from research down to posting it in their blog/website. But nowadays many new blogger simply doesn't want to do any research or to even write their own content, what they do is simply copy and paste other bloggers article. Which is of course a no no since copied content can now be penalized and when they try to apply for any monetization platform they will be disapprove especially when they will be applying for Google Adsense.

Disable text selection in blogger Excluding Blockqoute and Precode

This is actually the reason why most blogger disable the text selection in their site. Now for this tutorial, you are going to learn How to disable text selection in Blogger excluding Blockqoute and Precode. We exclude Blockqoute and Precode because if your blog is about giving tutorials then it is expected that you will be sharing code and of course your visitors will get irritated if even the code you are sharing cannot be copied.

To begin with the tutorial, simply follow the steps below:


Step #1: Log in to your Blogger Account and Go to your Blogger Dashboard.

Step #2: Click Template --> Edit HTML.

Step #3: Find ]]></b:skin> by Pressing CTRL + F (Windows) or CMD + F (MAC)

Step #4: Now paste the below code above/before ]]></b:skin>

.post-body {
 -webkit-user-select : none ;
 -khtml-user-select : none ;
 -moz-user-select : none ;
 -ms-user-select : none ;
 user-select : none ;
}

This code will prevent the reader to select any text on your blog post including Blockqoute and Precode.

To allow the readers to copy the code inside your blockqoute and Precode, follow the step below.

Step #5: Paste the below code above/before ]]></b:skin>  and Save your template.

Blockqoute:

post-body blockquote {
 -webkit-user-select : text ;
 -khtml-user-select : text ;
 -moz-user-select : text ;
 -ms-user-select : text ;
 user-select : text ;
}

Precode:

pre {
 -webkit-user-select : text ;
 -khtml-user-select : text ;
 -moz-user-select : text ;
 -ms-user-select : text ;
 user-select : text ;
}

That's it for this tutorial. Happy Blogging!
Learn more »

How to Embed Instagram Videos in Blogger Post?

Instagram (also known as IG or Insta) is a photo and video-sharing social networking service owned by Facebook, Inc. It was created by Kevin Systrom and Mike Krieger, and launched in October 2010 exclusively on iOS. That is for a little background.

How to Embed Instagram Videos in Blogger Post?


For this article, you are going to learn how to embed Instagram videos in blogger post. I include this tutorial here in vbt, since vblogger-templates (vbt) focuses more on video blog and It might come in handy for everyone.

There are actually different Methods to embed Instagram videos in Blogger post. For this tutorial we are going to have the 3 best ways to do it. Let start and simply follow the steps below.


Method 1: Adding Instagram Videos by using embed.ly


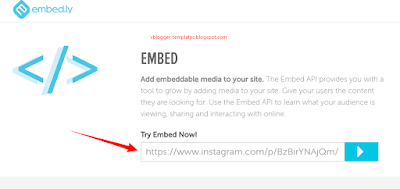
Step #1: Visit http://embed.ly/.

Step #2: Go to Product Select Embed Anything to your site.

Step #3: Paste your Instagram video URL and Click Try It.

How to Embed Instagram Videos in Blogger Post?

Step #4: Copy the "Embed code"


Step #5: Go to Blogger --> Add New Post --> HTML section and Paste the code.

That's it for the first method.

Method 2: Adding Instagram Videos by ctrlq.org


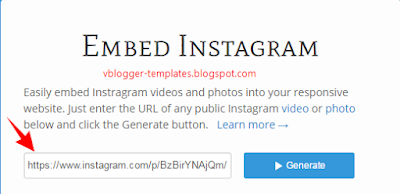
Step #1: Visit http://ctrlq.org/instagram/.

Step #2: Paste your Instagram video URL and Click Generate.

How to Embed Instagram Videos in Blogger Post?

Step #3: Copy the "Embed code"


Step #4: Go to Blogger --> Add New Post --> HTML section and Paste the code.

That's it for the second method.


Method 3: Adding Instagram Videos by changing the URL's


Step #1: Copy the URL of your chosen Instagram Video.

Step #2: At the END of that URL simply add /embed.

Example: https://www.instagram.com/p/BzBirYNAjQm

Output: https://www.instagram.com/p/BzBirYNAjQm/embed

Step #3: After editing the URL use the iframe below and include your edited URL as shown below.

<iframe frameborder='0' height='292'src='https://www.instagram.com/p/BzBirYNAjQm/embed?byline=0&amp;portrait=0' width='417px'/>


Step #4: Go to Blogger --> Add New Post --> HTML section and Paste the code.

That's it for the third method.

Well if you have any questions regarding this article feel free to comment and I will assist you all the way. Goodluck and Happy Blogging everyone!

Learn more »

How to Integrate Facebook Messenger in Blogger?

If you got any questions or inquiry with the admin of the blog you visited, you always find the contact page. Whether you will send your inquiry thru email or any other forms of communication.

Now one of the feature apps of Facebook is the messenger, basically this apps is used for communication. With this apps you can directly contact anyone from your friend lists in Facebook. Messenger is such a great tool for communication and we are going to integrate this in blogger so that visitors if they want to can directly send message to the Blog Admin.

This is how we are going to integrate this apps to your blogger site.

How to Integrate Facebook Messenger in Blogger?


To begin with our tutorial, simply follow the steps below.


Step #1: Log in to your Blogger Account and Go to your Blogger Dashboard.

Step #2: Go to Blogger Layout section.

Step #3: Click on Add Gadget and select HTML/Javascript gadget.

Step #4: Leave the title blank and Paste the below code into the HTML/Javascript gadget.

Note: Add the code including the CONTINUATION code below together as one.


<style type="text/css">#b-c-facebook .fbchat_box,#chat_f_b_smal,#f_bt_start_chat{background:#3a5897}#fbchat_box{padding-right:15px;max-width:210px;max-height:50px;display:block;transition:all .3s}#b-c-facebook .f-chat-conent .chat-single a,#chat_f_b_smal{font-family:Arial,sans-serif}#b-c-facebook .fbchat_box,#chat_f_b_smal{text-shadow:0 1px 0 rgba(0,0,0,.1);background-repeat:repeat-x;background-size:auto;background-position:0 0;text-decoration:none}.chat_f_vt{position:fixed;right:10px}#chat_f_b_smal{padding:0 10px;cursor:pointer;width:90px;color:#fff;height:38px;line-height:38px;background-color:#3a5897;border:0;margin-right:12px;font-size:14px;z-index:999999999;bottom:0;border-top-left-radius:5px;border-top-right-radius:5px;bottom:-400px;transition:all .3s;text-align:center;display:block}#chat_f_b_smal:hover{background-color:#3B5998;opacity:1}#b-c-facebook{margin-right:50px;bottom:0;z-index:9999999999;transition:all .3s;width:250px;height:auto;max-height:375px;min-height:38px;box-shadow:0 10px 50px 0 rgba(0,0,0,0.25);border-top-left-radius:5px;border-top-right-radius:5px;overflow:hidden;display:block}#b-c-facebook .f-chat-conent{float:left;width:100%;height:335px;overflow:hidden;display:none;background-color:#fff;position:relative}#b-c-facebook .f-chat-conent .chat-single{float:left;position:absolute;bottom:0;left:0;background-color:#fff;line-height:25px;color:#fff;width:100%}#b-c-facebook .f-chat-conent .chat-single a{float:left;text-decoration:none;margin-left:10px;color:#0C5BB5;font-size:12px}#b-c-facebook .f-chat-conent .chat-single a:hover{color:#F60}#b-c-facebook .fbchat_box label{width:185px}#b-c-facebook .f-chat-conent .chat-single label{float:right;color:silver;margin-right:5px;font-size:12px;font-family:Arial}#b-c-facebook .fbchat_box,#b-c-facebook .fbchat_box label{line-height:20px;margin:0;cursor:pointer;font-family:Arial,sans-serif;font-size:14px}#b-c-facebook .f-chat-conent .chat-single i{color:#0C5BB5}#b-c-facebook .f-chat-conent .fb-page{margin-top:0;float:left;height:310px}#b-c-facebook .fbchat_box{float:left;padding:0 25px;padding-left:15px;width:250px;color:#fff;height:38px;line-height:38px;background-color:#3a5897;border:0;z-index:9999999;margin-right:12px}#b-c-facebook .fbchat_box label{position:absolute;top:10px}//Widget by www.bloggerspice.com .title-f-chat-icon{margin-left:-10px}#t_f_chat{float:left;position:absolute;right:15px;top:-5px}#t_f_chat a{color:#fff;font-size:17px;font-family:verdana;text-decoration:none}#t_f_chat a:hover i{color:#ff0;text-decoration:none}.chat-left-5{margin-left:2px}#start_chat{position:absolute;width:248px;height:239px;top:70px;left:0;background-color:#fff;padding:10px;float:left;display:none}#start_chat em{font-size:11px;color:gray}.msg_b{color:#434a54;width:80%;word-wrap:break-word;overflow:hidden;font-family:Arial,sans-serif;font-size:14px;background:#edeef1;padding:10px;min-height:13px;margin-bottom:5px;position:relative;margin:5px;border-radius:5px;border:1px solid #dfe3e9}#close_chat{opacity:0.5}#close_chat:hover{opacity:1}.msg_b a{text-decoration:underline;color:#01509E}#f_bt_start_chat{margin:auto;background-color:#3a5897;border-radius:3px;color:#fff;font-family:Arial;font-size:14px;font-weight:bold;padding:9px 35px;text-decoration:none}#f_bt_start_chat:hover{text-decoration:none;opacity:0.8}#start_chat p{margin-top:30px}#fb_alert_num{background-color:#ff0;padding:0 7px;color:red;border-radius:40px;font-size:13px;font-family:Arial;font-weight:700;position:absolute;right:55px;top:12px;height:20px;line-height:20px;display:none!important}.hide_chatbox{display:none}#f_enter_3{margin-top:30px}</style>

Continuation Code:

<script>//<![CDATA[function check_fist_vist_f(){var _=f_read_cki("check_fist_vist_f");(0==_||""==_)&&(fb_eshow("f-chat-conent"),f_create_cki("check_fist_vist_f","1",1),f_create_cki("f_chat_open","1",1))}function close_chat(){fb_ehide('b-c-facebook'),f_create_cki('close_chat',1,1),$('body').find('.zopim').remove(),fb_eshow('chat_f_b_smal'),on_playsound('click')}function open_chat(){f_create_cki('close_chat','0',1),fb_eshow('b-c-facebook'),fb_eshow('f-chat-conent'),fb_ehide('chat_f_b_smal')}function f_bt_start_chat(){f_create_cki('f_bt_start_chat','1',10),fb_ehide('start_chat'),fb_ehide('fb_alert_num'),on_playsound('click')}function f_c_start_chat(){var t=f_read_cki('f_bt_start_chat');0==t||''==t?(fb_eshow('start_chat '),fb_eshow('fb_alert_num'),f_chat_step()):(fb_ehide('start_chat'),fb_ehide('fb_alert_num'))}function b_f_chat(){var t=f_read_cki('f_chat_open');0==t||''==t?(fb_eshow('f-chat-conent'),f_create_cki('f_chat_open','1',1)):(fb_ehide('f-chat-conent'),f_create_cki('f_chat_open','0',1)),on_playsound('click')}function f_ck_chat(){check_fist_vist_f();f_c_start_chat();var t=f_read_cki('close_chat');if(''==t||0==t||'0'==t){fb_eshow('b-c-facebook'),fb_ehide('chat_f_b_smal');var e=f_read_cki('f_chat_open');(1==e||'1'==e)&&fb_eshow('f-chat-conent')}else fb_eshow('chat_f_b_smal'),fb_ehide('b-c-facebook')}function f_chat_step(){on_playsound('door_bell')fb_eshow('f_enter_1');fb_eshow('f_enter_3');}function fb_eshow(t){document.getElementById(t).style.display='block';}function fb_ehide(t){document.getElementById(t).style.display='none';}function f_create_cki(t,e,n){if(n){var o=new Date;o.setTime(o.getTime()+24*n*60*60*1e3);var c='; expires='+o.toGMTString()}else var c='';document.cookie=t+'='+e+c+'; path=/';}function f_read_cki(t){for(var e=t+'=',n=document.cookie.split(';'),o=0;o<n.length;o++){for(var c=n[o];' '==c.charAt(0);)c=c.substring(1,c.length);if(0==c.indexOf(e))return c.substring(e.length,c.length)}return''}function on_playsound(t){}function ionSound(){1==web_sound&&$.ionSound({sounds:['click','door_bell'],path:fb_path.live_chat_path+'sounds/',multiPlay:!0,volume:'1.0'})}var web_sound=!0;jQuery(document).ready(function(t){t(window).scroll(function(){var e=t(window).width();680>=e?f_create_cki('f_chat_open','0',1):f_create_cki('f_chat_open','1',1)})}),setTimeout(function(){f_ck_chat()},1000);var $=jQuery.noConflict();!function(t){if(!t.ionSound){var e,n,o,c,_={},f={},a=!1,i=function(e){var c,a;-1!==e.indexOf(':')?(c=e.split(':')[0],a=e.split(':')[1]):c=e,f[c]=new Audio,n=f[c].canPlayType('audio/mp3'),o='probably'===n||'maybe'===n?_.path+c+'.mp3':_.path+c+'.ogg',t(f[c]).prop('src',o),f[c].load(),f[c].preload='auto',f[c].volume=a||_.volume},u=function(t){var e,n,o,c;if(-1!==t.indexOf(':')?(n=t.split(':')[0],o=t.split(':')[1]):n=t,e=f[n],'object'==typeof e&&null!==e)if(o&&(e.volume=o),_.multiPlay||a){if(_.multiPlay)if(e.ended)e.play();else{try{e.currentTime=0}catch(i){}e.play()}}else e.play(),a=!0,c=setInterval(function(){e.ended&&(clearInterval(c),a=!1)},250)},l=function(t){var e=f[t];if('object'==typeof e&&null!==e){e.pause();try{e.currentTime=0}catch(n){}}},r=function(t){var e=f[t];if('object'==typeof e&&null!==e){try{f[t].src=''}catch(n){}f[t]=null}};t.ionSound=function(n){if(_=t.extend({sounds:['water_droplet'],path:'/sounds/',multiPlay:!0,volume:'0.5'},n),e=_.sounds.length,'function'==typeof Audio||'object'==typeof Audio)for(c=0;e>c;c+=1)i(_.sounds[c]);t.ionSound.play=function(t){u(t)},t.ionSound.stop=function(t){l(t)},t.ionSound.kill=function(t){r(t)}},t.ionSound.destroy=function(){for(c=0;e>c;c+=1)f[_.sounds[c]]=null;e=0,t.ionSound.play=function(){},t.ionSound.stop=function(){},t.ionSound.kill=function(){}}}}(jQuery);//]]></script><a title="Open Chat" id="chat_f_b_smal" onclick="open_chat()" class="chat_f_vt">Open Chat</a> <div id="b-c-facebook" class="chat_f_vt"> <div id="fbchat_box" onclick="b_f_chat()" class="fbchat_box"> <label>Send Message to Admin</label> <span id="fb_alert_num">1</span> <div id="t_f_chat"><div class='close_chatfb' onclick='hidechatfb()'>&#95;</div></div></div><div id="f-chat-conent" class="f-chat-conent"> <div class="fb-page" data-tabs="messages" data-href="https://www.facebook.com/romebros/" data-width="250" data-height="310" data-small-header="true" data-adapt-container-width="true" data-hide-cover="true" data-show-facepile="false" data-show-posts="true"> </div><div id="start_chat"> <div id="f_enter_1" class="msg_b hide_chatbox"> Hello! Thanks for visiting my site. Please press Start button to Contact with Admin :) </div><p id="f_enter_3" class="hide_chatbox" align="center"> <a href="javascript:;" onclick="f_bt_start_chat()" id="f_bt_start_chat">Start</a> </p></div></div></div><div id="fb-root"></div><script>(function(d,s,id){var js,fjs=d.getElementsByTagName(s)[0];if(d.getElementById(id))return;js=d.createElement(s);js.id=id;js.src="//connect.facebook.net/en_US/sdk.js#xfbml=1&version=v2.5";fjs.parentNode.insertBefore(js,fjs);}(document,'script','facebook-jssdk'));</script>


Editing: Locate https://www.facebook.com/romebros and change "romebros" on your own Facebook page username.

Step #5: Now hit Save Button and Press the Save Arrangement button from the top.

Head over to your blog and see the result. 

That's it for this tutorials.. Happy Blogging!
Learn more »

How to make Blog Post Image Responsive?

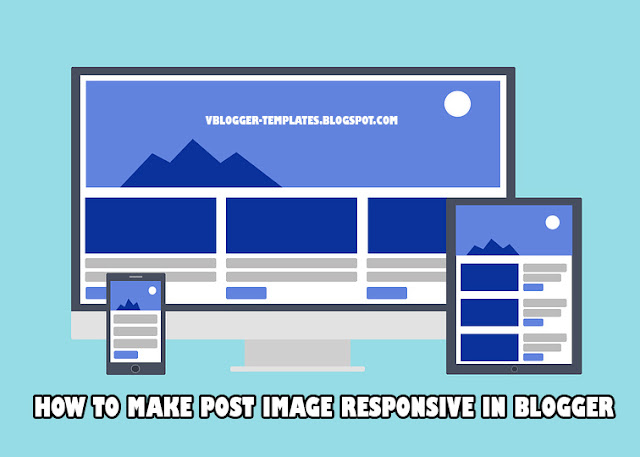
Today's trend in blogging is how to make your templates responsive, that it can adapt in any kinds of devices e.g. PC, Laptop, mobile, tables etc. This is also a challenge  on the part of every website/blog administrator.

There are instances that yes your templates is responsive but when your posting image/photos it display larger and some would even go out of the blog post body when seen in other devices.

Now to solve this issue, we have to make your image post responsive.

How to make Blog Post Image Responsive?


Just simply follow the steps below:

Step #1: Log in to your Blogger Account and Go to your Blogger Dashboard

Step #2: Click ->Template -> Edit HTML

Step #3: Find ]]></b:skin> by Pressing CTRL + F (Windows) or CMD + F (MAC)

Step #4: Now paste the below code above/before ]]></b:skin>


.post-body img {
  max-width:100%;
  height:auto;
}

Step #5: Now hit Save Template

The code width is define 100%, this means that image will be the same width according to your blog post width while the height is set auto.

That's all for this tutorials. To all visitors thank you for dropping by at vbt blog.

Happy Blogging!
Learn more »

How to add Spinning effect on Logo and Title?

Logo for a website or blog usually is a for branding purposes. It can give visitor/s the idea of what kind of website you have. Having fancy logo would also attract visitors to your site. Now for this tutorial, We will be showing you how to add spinning effect on your logo when mouse over.

This is such an amazing tricks since you are giving your logo an amazing effect that even your visitors can play around.

Let's start with the tutorial.

How to add Spinning effect on Logo and Title?


Demo: Mouse over VBT logo or see GIF below


Follow the steps below:

Step #1: Log in to your Blogger Account and Go to your Blogger Dashboard

Step #2: Click ->Template -> Edit HTML

Step #3: Find ]]></b:skin> by Pressing CTRL + F (Windows) or CMD + F (MAC)

Step #4: Now paste the below code above/before ]]></b:skin>


#header-inner{
 -moz-transition: all 0.8s ease-in-out;
    -webkit-transition: all 0.8s ease-in-out;
    -o-transition: all 0.8s ease-in-out;
    -ms-transition: all 0.8s ease-in-out;
    transition: all 0.8s ease-in-out;
}
#header-inner:hover{
-moz-transform: rotate(360deg);
    -webkit-transform: rotate(360deg);
    -o-transform: rotate(360deg);
    -ms-transform: rotate(360deg);
    transform: rotate(360deg);
}

Step #5: Now hit Save Template

Now head over to your blog site, mouse over to your logo and see that your logo is spinning.

That's all for this tutorials. To all visitors thank you for dropping by at vbt blog.

Happy Blogging!
Learn more »

Tutorial: One Click to Select Code Inside Blockqoute in Blogger

Sharing post in Blogger mostly required the use of blockqoute. Blockqoute highlight the text or code that you want to emphasize to your reader. If your into giving Blogging Tutorials, then blockqoute is often use to display your code within tag. The advantages is it will be easy for your visitor/s to copy the code, all code will be select instantly and less hassle in copying especially when there are bunch of code.

Tutorial: One Click to Select Code Inside Blockqoute in Blogger

Now this tutorial, "One Click to Select Code Inside Blockqoute in Blogger" will be a great help to your visitor/s. Let's proceed in installing this feature in your blog.

Demo

This is a demo page for this tutorial: One Click to Select Code inside "Blockqoute" in Blogger.
Just simply do "one click" inside this blockqoute and all this text will be selected.
Thank you!


Follow the steps below:

Step #1: Log in to your Blogger Account and Go to your Blogger Dashboard

Step #2: Click ->Template -> Edit HTML
Step #3: Find  </body> by Pressing CTRL + F (Windows) or CMD + F (MAC)

Step #4: Copy the code below and Paste it above/before </body>

<script type='text/javascript'>
var pres = document.getElementsByTagName(&quot;blockquote&quot;);
for (var i = 0; i &lt; pres.length; i++) {
pres[i].addEventListener(&quot;click&quot;, function () {
var selection = getSelection();
var range = document.createRange();
range.selectNodeContents(this);
selection.removeAllRanges();
selection.addRange(range);
 }, false);
}
</script>

Step #5: Save your Template

Customization:

- If you want to use double click simply change click to dblclick.


That's all for this tutorial. Check your blog to see it live.
Learn more »

Tutorial: How to Embed Facebook Video in Blogger 2019?

Facebook has been one of the most famous social networking site nowadays. Most people used Facebook for Business or personal interest. You can actually share Pictures, short videos and even full movies in that site.

Now this tutorial is intended to give you a background on how to Embed Facebook video in blogger post.

How to Embed Facebook Video in Blogger 2019?


    Now before going to the actual tutorial, let us first see the live Demo below on the sample video I Embed in this post.

    Demo: Embed Facebook Video in Blogger


    Method #1: Facebook Video Embed Code


    Follow the steps below:

    Step 1: Go to Facebook.com and open the video that you would like to Embed.
    Step 2: Look and click below the video, towards right for the three (3) dot,
    Step 3: Choose "Embed".

    How to Embed Facebook Video in Blogger 2019?

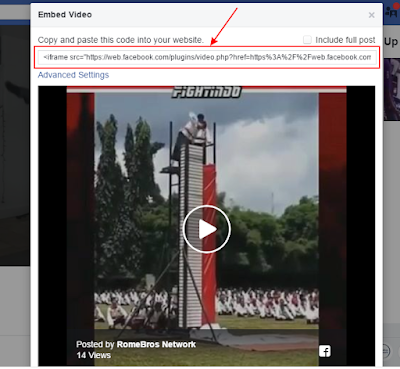
    Step 3: New Window will Pop Up, Select all "iframe Code"

    How to Embed Facebook Video in Blogger 2019

    Method #2: Embedded Video Player Configurator


    Follow the steps below:

    Step #1: Choose URL or Page
    Pick the URL of a Facebook video you want to embed.

    Step #2: Code Configurator
    Paste the URL to the Code Configurator and click the "Get Code" button to generate your embedded video player code.

    Step #3: Copy & Paste HTML snippet
    Copy and paste the snippet into the HTML of your post.

    How to Embed Facebook Video in Blogger 2019

    Embed Video in Blogger


    Go to Blogger >> Add a New Post >> HTML Tab >> Paste your code in the HTML Editor.

    That's it, Publish your post or preview your post to see the Facebook Video embedded on your site.

    Learn more »